The waterless nursery project is an ongoing project. We are keen to do some experiments with other materials to hold the water also. This project ties in with the Waterless Garden project.
Observations: We have had some really hot weather this summer and have found the waterless nursery to be fabulous. It has saved us time watering every day and worry about if plants are getting enough water or not.
We feel that this could be modified in many ways to create plantable veggie gardens and other things. Just keep in mind root length of plants if planting in these systems as you may need to modify designs to accommodate different plants etc.
Now we are getting heaps of rain we are wondering if we needed to put more woodchip in ours so there was less room in the tops where the plants are. We have done a variety of heights and will see what happens after this rain. Also wondering if an overflow may have been a good idea so the plants don't drown, we have needed to scoop out some water over the last few days as the tops have filled out.
How to make a waterless nursery:
1. Place newspaper on the ground quite thick (to prevent plastic tearing or things sticking though).
2. Stack two kiwi collars on top of each other on top of the newspaper:
You could also make your own out of old crates/pallets or other wood. Kiwi collars are great as they can be shaped into different shapes and have a special stacker lock hinge so they don't move when attached together. (check out
www.kiwicollars.com.au for more information).
 |
| kiwi collar |
3. Line the kiwi collars with plastic, peg the plastic to the sides to keep it in place (we used a double layer of builders lining plastic.
 |
| line with newspaper |
4. put newspaper on top of the plastic in the bottom of the kiwi collars to prevent the woodchip from sticking through the plastic.
5. Add a piece of pipe as a water inlet so you can fill the kiwi collars with water and add water incase it gets too dry from time to time if needed. (we put a flower pot with a bit of shade cloth over the pipe inlet so that the woodchips do not block up the pipe and water has a free flow in.)
 |
| newspaper lining, water inlet |
6. Add woodchip to desired height
 |
| adding woodchip |
7. Put in a layer of regen felt, this stops weeds and creates a wicking effect
 |
| felt layer |
8. Add woodchip on top of the felt
 |
| add woodchip (trim plastic if needed) |
9. Add a soil layer to the top if you desire to plant into it to make garden beds
10. We didn't put a soil layer as we just want this to be a nursery, so all our plants are in pots at this time and sitting directly on the felt wicking the water up. They are working really well!!
 |
| nursery plants in their self watering beds |
 |
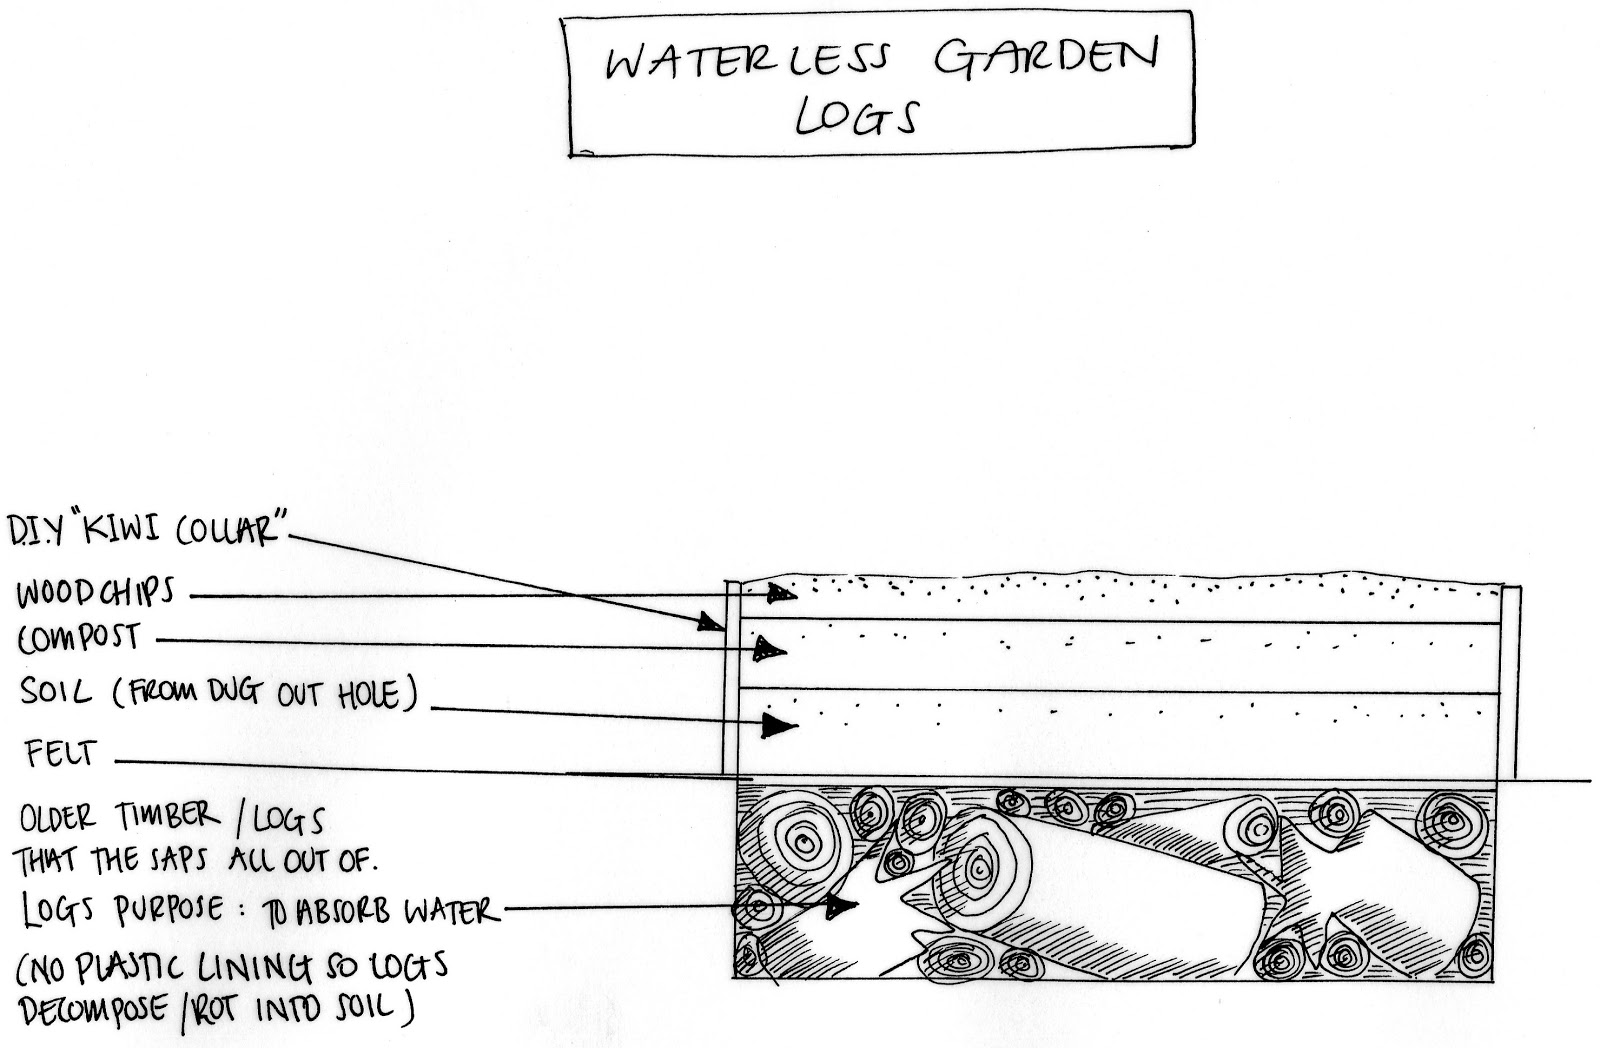
Depending on weather conditions it could be a good idea to actually line this with plastic. I know on the illustration
it says don't need lining but Lincon and Philippa have noticed with the dry weather that it would have been a much
better idea to line it. The 'Kiwi collar' in this image can also be dug into the ground, it does not have or need to be above ground to work. Decisions can be made to suit the design you desire for your project. |
 |
This is an experiment and not sure how it is going. We are going to also try one with small pebbles and woodchip and see what happens. Same concept as above. The layers can be used and modified for your particular project.
|
 |
An experiment with collecting dew to water plants. - we suggest plastic lining for both logs and rocks at this time
|
 |
| condensation collecting area in the waterless garden |
 |
| Once again we suggest to line the dug out area with plastic. (The wood is underground) |
 |
'Hotspot' in the waterless garden project
|
Thank you to AJ and Mary, Philippa and Lincon for some of the photos in this post.
Thank you also to AJ for demonstrating and bringing our awareness to this method of gardening.


No comments:
Post a Comment